There Is No Such Thing as a Hard Triathlon Bike Course
Technically, no, not in the truest sense of the word “hard” or when it comes to cycling. So while that course profile might seem pretty legit to you, know that there are tons of other events with harder courses, more gain, and more overall suffering than any Triathlon Race Director is willing to make you suffer through. After all, they want you to live so you can come back and race it next year!!
You should be afraid.
There are a few simple reasons why we, as coaches, want some fear to enter the equation.
First, this is a bike within the context of a day of swim / bike / run. In other words, it’s not just “a bike ride” but a race within a race. This means the basic rules of pacing and nutrition, the ones you have learned in training, really don’t apply to race day.
Second, because it’s so darn easy to screw it up. Sure you’ve ridden 56 miles (nay, more!) in training, so what’s the problem with racing on the big day? Odds are you’ll do it wrong, like 95% of the other athletes out there. You not only make the bike harder than it needs to be…but you sabotage your run too! Nice job!
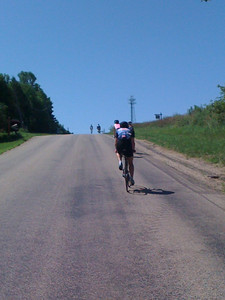
Climbing in Madison
How to Approach The Bike Portion Of Your Next Triathlon
1 – Get Knowledge
As you get closer to your next “A” race, regardless of distance, you should spend time reviewing the bike profile. If possible, make a trip out to the race site to experience it firsthand. If not, get online and ask folks for information and feedback on the course so you can be better informed.
Tip: This is one of the biggest benefits of being part of Endurance Nation, as you have access to countless race reports from across the US, and the people who wrote them!
2 – Get Gearing
Once you know the course, it’s time to evaluate the equipment on your bike. While there is no such thing as a really hard triathlon bike course, some course are harder than others. And some athletes are less prepared than others. Choosing the right gearing in the back to match the terrain of your “A” race will ensure a much improved performance on race day.
The standard bike comes with a 53/39 front chainring and (usually) an 11/23 cassette in the back. This type of configuration is great for the moderate to strong cyclist who will train and race in the flats. In general, Endurance Nation recommends that you run a compact crank on the front, with 50/34 front chainrings, and a 25/12 or 11 cassette on the back, so that you have the flexibility to handle all sorts of terrain.
Tip: If possible, try to negotiate to have this installed before you buy your next bike, as it does cost $$ to swap the chainrings out and adjust the chain!
3 – Get Your Effort Dialed In
The most important part of approaching a hilly course is to know your personal bandwidth for effort. Most triathletes have no business pushing the effort on hills; remember you have a run to do still! Even if you follow our climbing guidance (below), you still need to have a laser lock on what it means to ride at the proper intensity.
The overall intensity you target for the bike should be a function of (A) how challenging the bike course and (B) how well you want to be able to run off the bike.
For most triathletes, race day is about simply not slowing down on the run. As such, the default effort should be conservative. But if the bike course is such that it dominates the event, or could affect you overall placing relative to the competition, you may choose to be slightly more aggressive with your overall effort.
The best way to pick the right effort is to use previous race data as a guide. If that’s not available, then your Race Simulation workout is a good starting point for know what you should / shouldn’t be able to achieve on race day!
The Official How NOT To Climb Hills on Race Day Video
The bib numbers and faces have not been changed to protect the guilty climbers you see depicted here!
How to Climb Hills “EN Style” and Beat the Competition
The key is understanding that 90 percent of the field will be working too hard on the hills. These aggressive efforts express themselves on the run as dramatically slowing down in the second half, usually giving up any of the small gains made when climbing.
Summarizing a Typical Hill Climb
Entrance to Hill: Power spike, as your body seeks to maintain a constant cadence and speed. Very little to no tactical gain achieved.
Body of Hill: After this initial spike, you drop off the power considerably. Heart rate now begins to catch up to effort until it rises above where you would like to see it. You back off the power again to reduce the effect of the hill on your body.
Crest of the Hill: Significant power loss, as your body senses the opportunity to rest right now after the hard climbing effort. You start to rest at the crest and on the initial portion of the downhill, just coasting along.
How We Ride A Hill
In our years and years of power experience, we can tell you that this initial power spike is—98 percent of the time—far higher than you should be riding. Therefore, pay attention to the pressure on the soles of your feet and shift down through the gears as you feel this pressure increase (power spike).
Your goal is keep a constant pressure on the soles of your feet by downshifting quickly through the gears as you transition from the flat to the entrance of the hill. This attention to the pressure on the soles of your feet, and downshifting quickly to keep your cadence up and this pressure low, will usually prevent you from making a huge power spike.
Summarizing an EN Hill Climb
Entrance to Hill: Steady power / effort, shifting your gears to maintain momentum as your overall speed drops. The athletes around you will open up a gap at the start of the hill. You’ll see them standing while grinding a hard gear. You’ll hear the frame creak or the tires bite the pavement as they stomp on the gas. Remember: if you’re not doing what everyone else is doing, you’re usually doing the right thing! Having people gap you at the entrance of a climb is almost always a very good thing: they are working too hard, you’re not.
Body of Hill: You sit on this constant power and settle into a nice rhythm that you can sustain through the crest of the climb. The initial gap between you and other athletes will stabilize or decrease a bit. More importantly, pay attention to their body language. As they realize their initial effort was too hard you’ll see them come off the gas a bit. You might also see them start to bob and weave in an effort to maintain their relatively poor gear choice through the entire climb.
Crest of the Hill and Downhill: This is where the fun starts! Watch as others really step off the gas, while you simply maintain your climbing effort across the crest and into the downhill. This will allow you to quickly accelerate with no additional effort; you will literally coast by them as they desperately pedal to try and capture some of Gravity’s help.
To recap, your goal is to manage your effort up the hill without spending it needlessly at the start. Conserve your energy and then simply maintain it over the crest and into the first third of the downhill. You will quickly accelerate to top speed, carrying this speed across the intervening flat and into the next hill.
This methodology requires you to have the patience to let folks go early (they will come back later!) and the discipline to ride the right numbers / effort that you can truly sustain.
They will come back to you, either on this hill, the next, or on a flat, or on the run…or not. What’s important is that you focus on the real game—the last portion of the run—and don’t get caught up in fighting for three to five bikes lengths of real estate on some no-name hill in the middle of a much bigger day.
Additional Resources
>> Keeping Watts, or Effort, Down on Steep Hills
>> Racing In A Box
>> Climbing On A Bike [Coach Rich Video]


Leave a Reply